
I’ve always really loved to read about other writers’ writing process. I still devour books where authors tell you how to write a book because I like to see what they do. Sometimes I’ll try some of their tips, and maybe they’ll work or maybe they won’t. But I still love hearing what works for other people and why.
I’ve been using Scrivener for over a year now and I have to say that I absolutely love it. I love reading how other writers use Scrivener and so I wanted to share some screenshots on how I use it. My writing process in general is a combination of tips I’ve learned from other writers and things I’ve figured out on my own. I used to do it all on paper and had these big three ring binders with my story notes and outlines, etc. But a few years ago, I turned my process into an almost entirely digital format with Liquid Story Binder. LSB is still a really great program and definitely worth looking into, but when I switched to a Mac I had to get a different writing software because LSB is Windows only. So I decided to switch to Scrivener and have been very happy with it.
These screenshots are from my project file for The Rules of You and Me. I write on a Macbook Air, so I do use the Mac version of Scrivener. The Windows version doesn’t have all of the options that the Mac version has, so keep that in mind in case you see something that I do that you can’t do on yours if you’re using Windows.
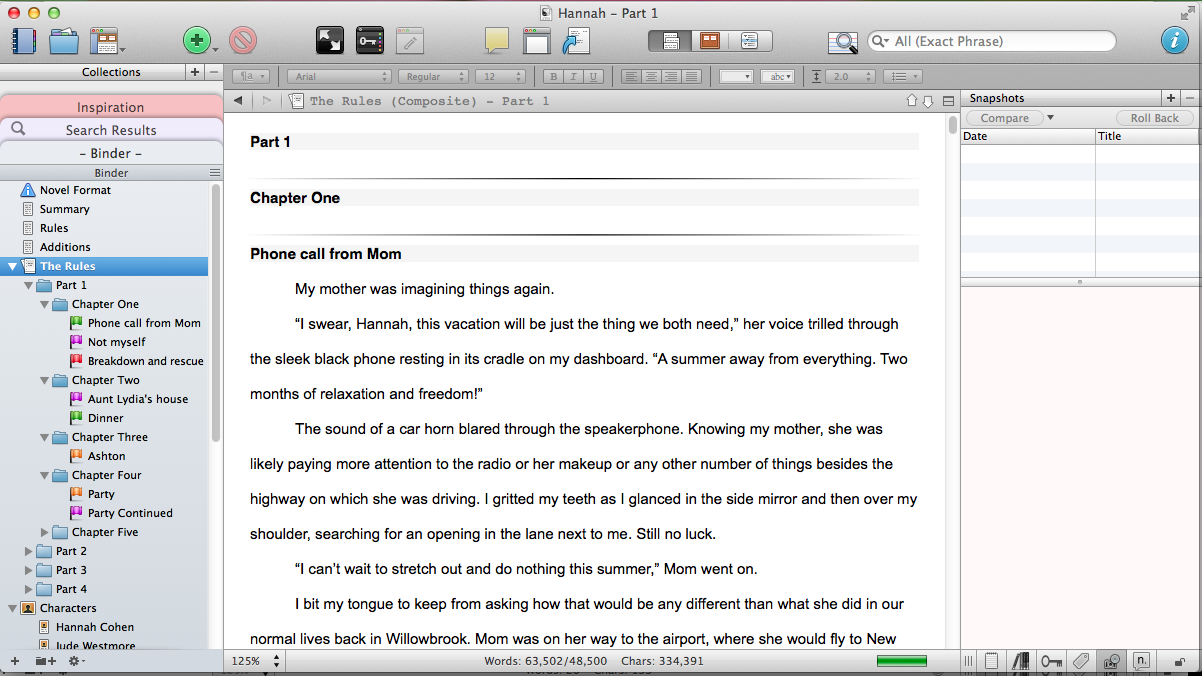
(Click on the picture for a closer look)
This is how I typically lay out my project. I like to have a “Summary” document (sometimes I call it plot or synopsis, just whichever word pops into my head first when I create a new project). I’ll also have an “Additions” document which is where I add things that pop into my head as I’m writing. For example, say I’m working on a scene toward the end of the book, but I think of a detail to add into a scene at the beginning of the book. Instead of stopping and going back to that previous chapter, I just open the Additions text and type it in there, then deal with it later. I do this also for ideas I have for later in the book when I’m working on the beginning. I don’t have one in this project, but I’ll usually also have a “Cuts” document where I stash things I cut out of a scene that I think I might want to use somewhere else.
The document labeled “Rules” between Summary and Additions is unique to this book. I needed a place to keep track of the rules for life that Hannah has and the ones she and Jude make up in the book.
If you’ll notice, the book is divided into chapters and also parts. I want to point out here that I do not write in chapters and parts when I write the first draft! I concentrate only on scenes, not chapters. After I have the first draft done, then I go back and structure the book by adding in chapter breaks and arranging the book into four parts: beginning/set up, first half of the middle up to major midpoint, second half of the middle up to the climax, and ending/wrap up.
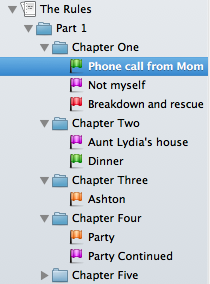
Another thing I do after writing the first draft is to change all of my icons for each scene to a certain flag color. The flag color represents the major plot line that runs through each scene. For this book, green flags are the family plot line, purple is personal development, red is romance, and orange is friendship. That doesn’t mean that each scene only deals with that particular plot line, it just means this is the plot line that this scene touches on most. There may be a scene that’s labeled personal development, but it also includes a little bit of romance. However, I color code it to the plot line that is mostly dealt with in that scene.
Why do I do this? Besides the fact that I like looking at the rainbow of colors 🙂 it also helps me at a glance to see how the story lines are weaving together. If I have too many red flags in a row, I know to work in some of the other plot lines a little more.
In the right column, I store a short synopsis of that scene. I also label it according to the story line the scene is mostly about (the label matches the color of the flag I used on the left). Status sometimes changes if I feel like changing them. Sometimes I’ll write document notes in the yellow box, little bits I want to remember or add, but sometimes it’s blank.
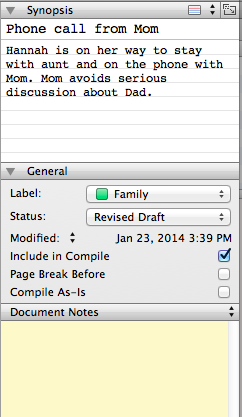
One of the things I really love is making character sheets. I used to do this in composition notebooks and I still have some from stories I wrote as a teen. Now I create them in Scrivener. Yes, that is Channing Tatum. That’s what I imagine Jude Westmore to look like. (With longer hair.) The character notes are just some basic info I want to be able to pull up easily. Mostly when I can’t remember what color eyes a character has. Sometimes the character sheets are very detailed, sometimes they only have a couple of notes on them.

(Click the picture for a close up.)
Now this. This is one of my favorite parts of Scrivener: my inspiration board. To do this, I make a new collection called “Inspiration” and I use the cork board view to pin pictures and song lyrics as inspiration. I also include bits of dialogue I want to use in the book. This is part of my beginning process for creating a new book, when I’m just throwing a bunch of random things together from the ideas in my head. On the right, I start writing down notes and ideas for the book. Don’t read that if you don’t want to be spoiled about some things that happen in The Rules of You and Me! And yes, those notes do say Jackson instead of Jude. I changed his name after I started working on the book. He turned out to be more of a Jude than a Jackson.
Sorry to whoever that girl is. I don’t remember where I found the picture. I was searching online for an inspiration picture for Hannah and found that one. I don’t use it for anything except my own personal use in my inspiration board.
So this was a basic overview of how I set up Scrivener and how I like to use it. I love this software and rely on it for most of my writing now. I write articles for different clients as a freelance writer, and so I have an “Articles” project file in Scrivener. That one is simply divided into the following sections: Written, Submitted, and Published. I create a new document for each article and it gets first placed into the Written folder in Scrivener. Once I’m done with it and have sent it off to my client, I move it to Submitted. If it’s good and is accepted, it gets stored into Published. If it’s rejected, it gets moved back to Written. This is so I can know at a glance which articles are available to be sent out, which are currently waiting for a reply, and which articles I could try to sell reprint rights or develop a new idea off of. I also have another project file for short stories and each story gets its own folder and documents. Since they’re such small projects, I just don’t see the need to set up tons of new project files for each individual article or short story, so I group them together.
If any of you have questions about how I use part of Scrivener, or want some more detail on a certain feature, let me know in the comments! I have no affiliation with Scrivener or Literature and Latte, and I don’t receive any reward if you guys start using it. I’m just a writer sharing one of the major tools of her writing process.
Great post! I love reading about other writers’ writing processes, too. I find my process still likes to evolve a little bit from project to project, but Scrivener has been a constant for a long time. I love your idea for the inspiration board. I’ll have to try that. I have a physical collage pinned above my desk for basically the same reason. Doing it in Scrivener would be much easier! Thanks for the tip! 🙂
My process still evolves a bit too! Sometimes what worked for one project, just doesn’t work for the next one. I still keep a few inspiration pictures I find in magazines, but most of my inspiration board is digital now. I got the idea from someone else who uses an inspiration board in Scrivener too, but I can’t remember who it was. It’s a great idea though and has been a ton of help!! I hope you have fun with it! Thanks for reading! 🙂
Great post!
I’ve borrowed a few of your ideas and hope to throw a blog post up in the next few days once I get going on my short story. Thanks 🙂
I’m looking forward to seeing your blog post! I love seeing how Scrivener works for other writers. 🙂 Thanks for reading!
How do you do that lovely formatting for your character page?
Hi Gina,
The character page is formatted by Scrivener. If you use their Fiction Novel template when you start a new project, it will have a character page already set up and formatted. Then you can make new ones based off the one that’s already there. I hope that helps! 🙂
will you mind if I retweet your post?
I don’t mind at all!
That’s great. I love it too. My only problem with Scrivener is that it doesn’t have an iPad app! If I sneak in any writing during a quiet moment at work I have to copy and paste it into the right part of Scrivener when I get home. It’s hardly the end of the world but its tedious.
Comments are closed.